Let’s Create a Cryptocurrency for Fun using JavaScript
How to make a simple cryptocurrency using JavaScript

Today, we are going to build a cryptocurrency using the blockchain we created earlier. If you haven’t read it yet, I will quickly recap that with slight modifications but you should read the previous article first.
What are cryptocurrencies and how do they work?
Cryptocurrency is the basic form of currency to carry out transactions on the blockchain network and other web 3.0 applications. According to Satoshi’s white paper on Bitcoin, an electronic coin is just a chain of digital signatures. Its main characteristic is decentralized so that no government or outside influence is possible. And another benefit of cryptocurrencies is anonymity i.e. you cannot track a person from their transactions since anyone can join the network without a KYC!
A coin is transferred from one person to another using their public key stored in their wallets. And the transaction is digitally signed by the sender’s private key so that the transaction can be verified by anyone using the sender’s public key.
Whenever a transaction is initiated it is temporarily stored in a pool on the blockchain network. When there is a sufficient amount of transactions gathered in the network pool, all the transactions get permanently stored in a new block (initiating the mining process) and removed from the pool.
How and who generates cryptocurrencies?
The generation of cryptocurrency is termed minting. The currencies are minted by the blockchain network as a reward (incentive) to the miner nodes who successfully mine a new block by solving the cryptographic puzzle.
Where are the coins stored for a user if they don’t have an account?
The coin balance that is shown in the wallets is just the remaining coins that are not spent in any transactions. We just need to calculate the number of unspent coins against the user’s public key to find their coin balance.
Prerequisites
To follow and understand this tutorial you should be familiar with these:
- Working knowledge of classes and other ES6 features in JavaScript.
- NodeJS installed on the machine.
Let’s quickly recap the Blockchain
From the previous article, we learned that blockchain is just a chain of blocks. So let’s implement the Block class first:
In the above code, we just added a root hash property in the Block. This root hash is generated by creating a Merkle Tree from the transactions list. The data property will contain the transactions list.
The getMerkleRoot uses the Merkle Tree class that we implemented in this Article. The Merkle Tree implementation is available in this GitHub gist. Let’s see how the getMerkleRoot and calculateHash is implemented:
Now implement the Blockchain class:
We have updated the blockchain class by removing the genesis block with null data. This is because we want to mint the first cryptocurrency and it is not possible if we pass null data. We will initiate a transaction of 10000 coins to the first user that will be stored in the genesis block.
Getting started with the cryptocurrency
We will create the cryptocurrency through transactions in the network. The coins are just a number represented in a transaction. They don’t exist other than that. Transaction class needs the following properties:
- The sender’s and receiver’s public key
- The amount to be transferred
- The id of the transaction
- The hash of the content — sender’s and receiver’s public key, amount & id (it's important to not mess up the order while verifying, otherwise the hash will not match — happened to me;p)
Defining the Transaction class
We have used the uuid package from npm to generate our unique Transaction id. To install, just execute npm i uuid from the terminal.
updating the Blockchain class
Now we need to add a transactions property to the Blockchain class to store all the pending transactions on the network. And also a reward property that contains the amount of reward to be given to the miner node. Next, we will add a addTransaction method to the Blockchain which will take a transaction and it to the pending transaction pool by ensuring that the given transaction doesn’t exist in the pool already.
We need one more method to check the balance remaining for a user. As we discussed earlier that the balance is just the untransferred amount for a given public key (the user’s identity is denoted by his public key). So we need to check for the amount in all the transactions stored in all the blocks.
Get balance method
In the getBalance method, we checked all the blocks and all the transactions in the blocks. If the transaction contains the given public key, we check if the public key is the sender or receiver. If the key matches the sender we deduct the amount from the balance else we add the amount to the balance.
Moving on to the Wallet
The wallet will contain the necessary information for the users. All users will interact and initiate a transaction through their wallets. The Wallet class will have the private and public key pair for a given user.
Defining the Wallet class
Here, we have used the generateKeyPairSync method of the crypto library. We use RSA keys for our implementation, but Bitcoin and Ethereum use ECDSA on the secp256k1 curve. Unfortunately, the crypto does not support this format entirely so we used RSA.
Now we need a send method in the Wallet class that will create a transaction for the user. The send method will accept an amount and the receiver’s address (public key) to whom the amount is to be transferred.
But before we implement the send method, we need to digitally sign the transaction. Otherwise, the transactions will not be verifiable. So first we implement the sign method in the Transaction class.
Signing the Transaction
Now that the sign method is implemented on the Transaction we can focus on the send method.
The send method
So far we are implementing all these methods but there’s a fatal problem that needs to be solved. You might have noticed that there’s no validation of the transaction we have implemented yet. Let’s address this issue now.
Validation
We will add a isValid method to the Transaction class to validate the transaction. The transaction should contain a valid sender, receiver, amount, the sender’s balance should be greater than the amount that is transferred, the hash of the transaction should be equal and the signature should be verified.
Validating a single transaction
Remember that we have been adding the transaction in the transaction pool of Blockchain without validating the blockchain? We need to validate each transaction before pushing it to the pool. We will add the following line in place of the if condition in the addTransaction method in the Blockchain class.
if(!isDuplicate && transaction.isValid(this))
Validating all the transactions in a block
Now, we need to validate all the transactions inside a block. We can do that by looping over all the transactions and validating each one of them. We will use the every method which is a higher-order function in JS that lets us check all the elements in an array for a condition and returns false if any one of them returns false.
Mining the transactions
Finally, we need to mine the transactions i.e. mine a block with all the pending transactions. We will implement a mine-transaction method in the Blockchain class to mine a block. After adding all the transactions to the new block, we will empty the pending transactions list.
One more issue needs to be addressed
We said that we will reward the mining block with a fixed reward and we haven’t implemented it yet. In the mineTransaction method of blockchain, we need to create another transaction that transfers the reward to the miner’s address. But the problem is — who is the sender in this case?
Rewarding the miner
We need to create a wallet for the blockchain network which will be accessible to all the methods and classes. And we also need to make an exception for the isValid method in the Transaction class for the Network wallet, since the Network wallet doesn’t have any balance but is capable of creating new coins. Then we will add a reward transaction to the mineTransaction method.
Releasing the first few coins
We will initiate the blockchain instance with an initial transaction for some coins to the first user. The transfer will occur from the Network wallet otherwise it will not be validated since no coins exist previously. We will mint the first coins and transfer them to the first user’s wallet.
Updating the Blockchain create method
In the above method, we first created the transaction from the NETWORK_WALLET to the first user’s address. Then we mined a new block with the first transaction and added it to the blockchain. This will be the first block in the blockchain so we can call it the Genesis Block.
Moment of Truth
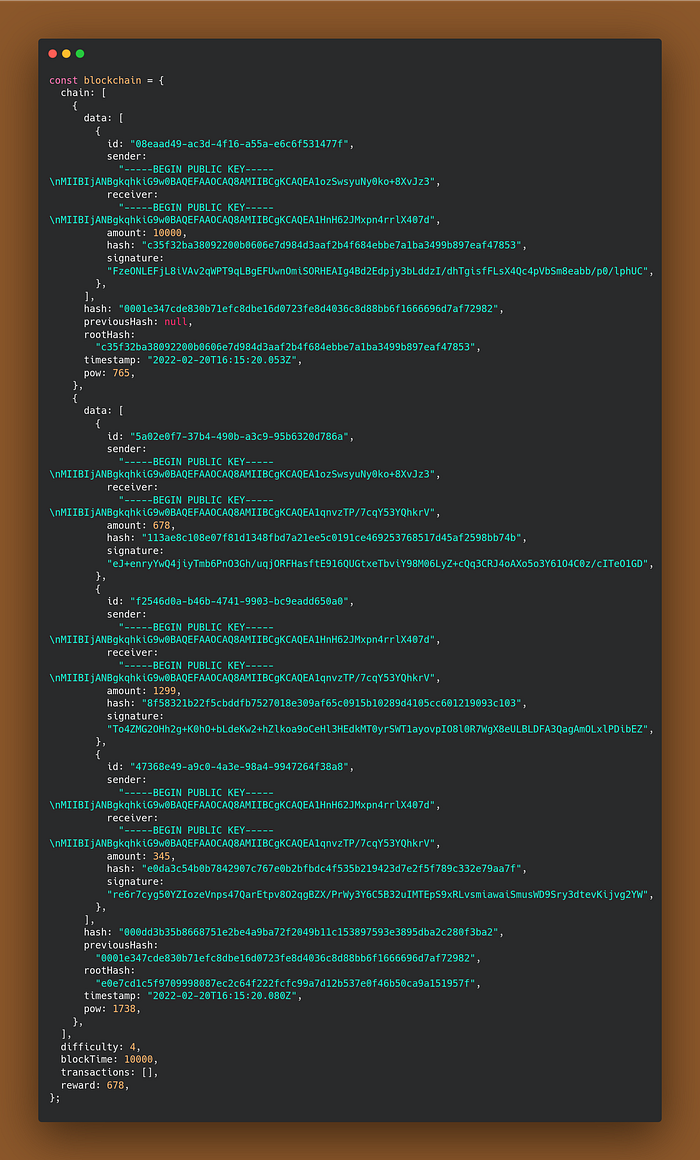
All the necessary code has been implemented, now it's time to test it. First, we need to create wallets for 2 users for doing transactions between them. Let’s call them Alice and Bob for obvious reasons ;p. Now we will instantiate the blockchain network by giving away the first coins to Alice who’s the first user. Then we will transfer some coins from Alice to Bob and check the balance of both the users and check whether the blockchain is valid after all the transactions.
After executing the file, we should get the balance of Alice to be 8356 and Bob to be 2322. And the next line should be — “Blockchain is valid”. And the snapshot of the blockchain should be something similar to the image below.
Conclusion
Today we learned how cryptocurrencies work under the hood and how to create a simple one using JavaScript. We utilized the blockchain that we learned earlier from this post. The source code is available in this Github Repository and the files are written in TypeScript which is a superset of JavaScript. The instructions are provided in the readme.
Next Up: we will implement a peer-to-peer network for the transaction of the coins. The post will be dropping very soon. So don’t forget to follow me and subscribe for the email updates if possible.
Happy Hacking!
More content at PlainEnglish.io. Sign up for our free weekly newsletter. Follow us on Twitter and LinkedIn. Join our community Discord.

